

What is a website widget?
Website widgets enable you to quickly and easily add a large variety of functionality to your online pages to increase user engagement. No code required. This powerful tool is now conveniently integrated into the Kajabi Page Builder, allowing you to add features and functionality to your website pages and landing pages in as little as a few clicks.Which types of widgets can I add?
Enjoy an extensive collection of customizable, mobile-friendly widgets, including but not limited to the following website widgets: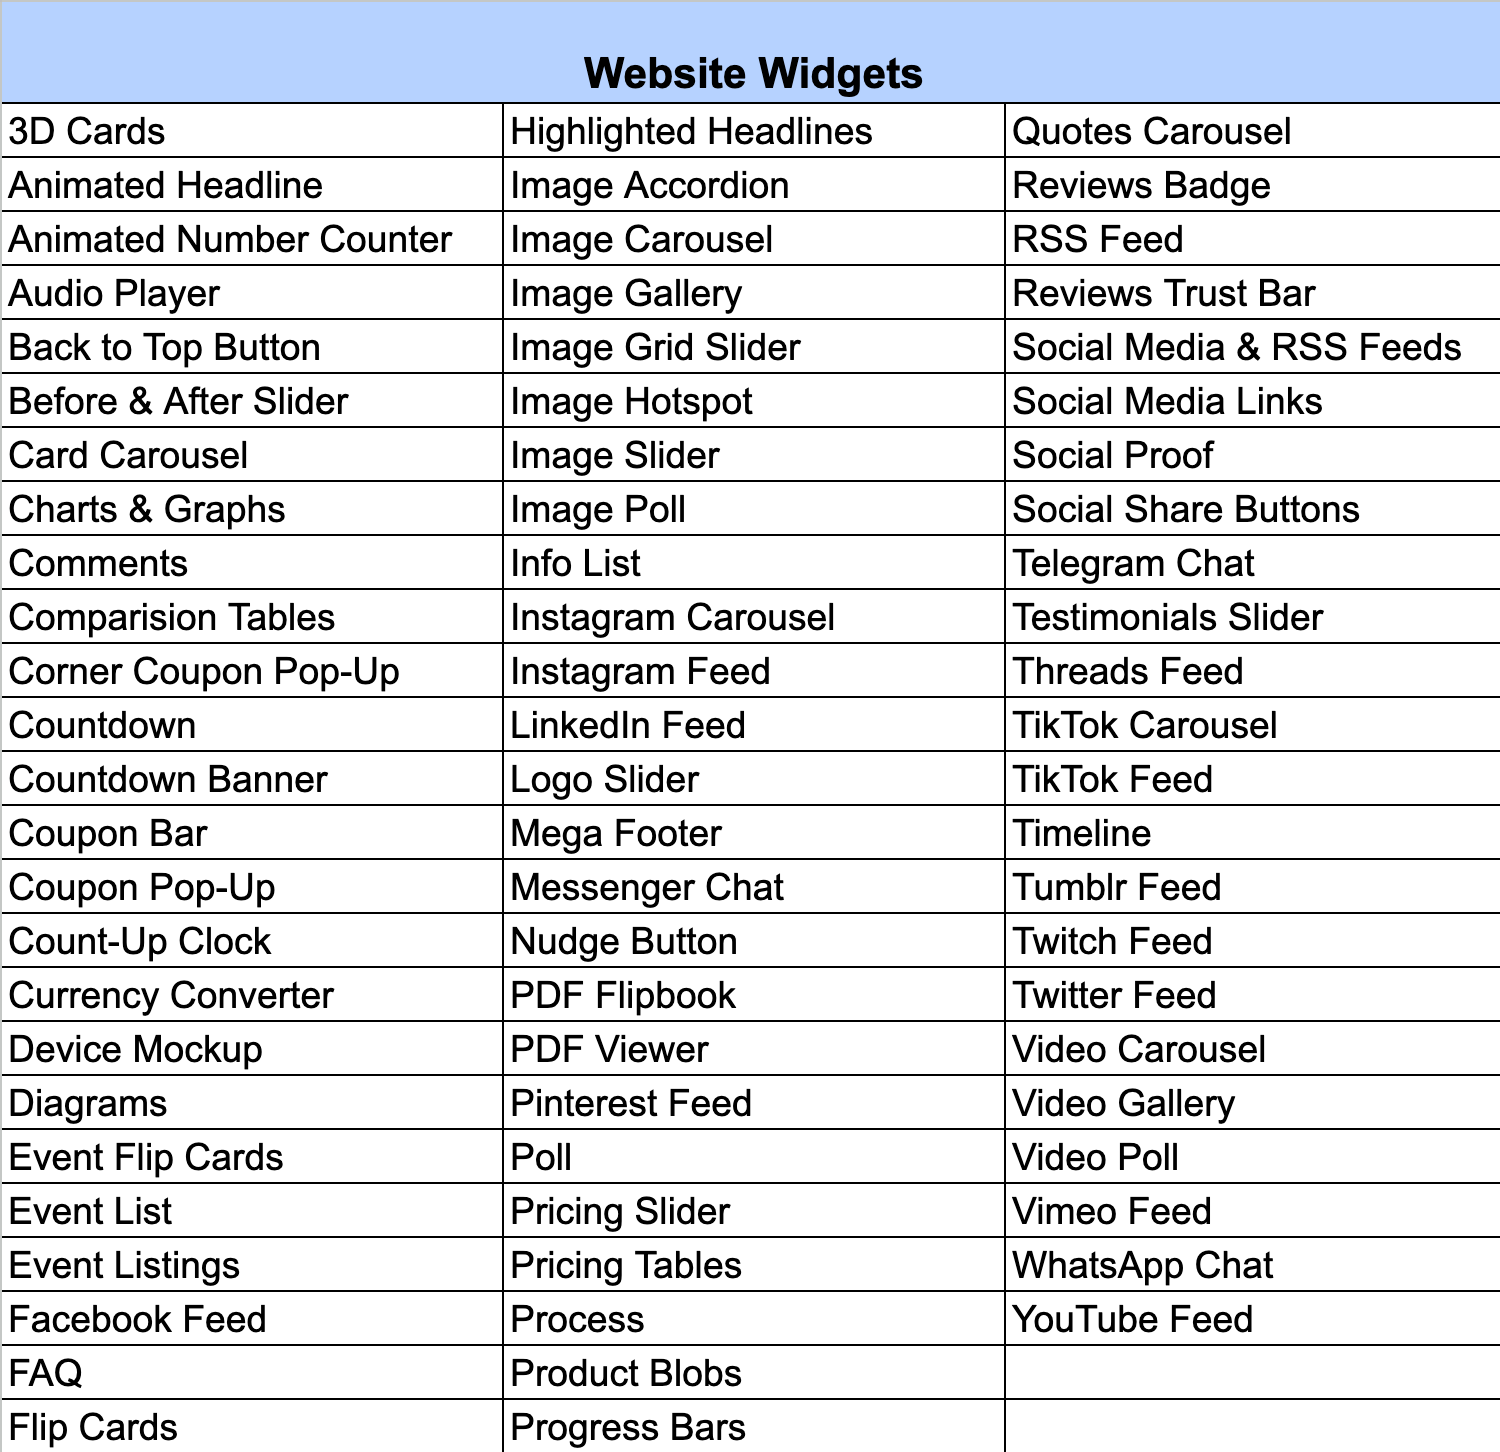
Does it cost extra to add a website widget?
Kajabi is not applying the page view limits for our Heroes at any tier. Website widgets are an add-on to your base Kajabi plan fee. The website widget Free tier allows you to add 1 website widget to 1 page in your Kajabi account free of any extra cost (i.e. if you have multiple sites in your account, you’ll only be able to add a widget to 1 page of 1 site for free). Adding more than 1 website widget in your Kajabi account will be subject to an additional cost outside of your base plan fee. Multiple paid tier levels are available for you to choose from so you can pick the add-on plan that best fits your business: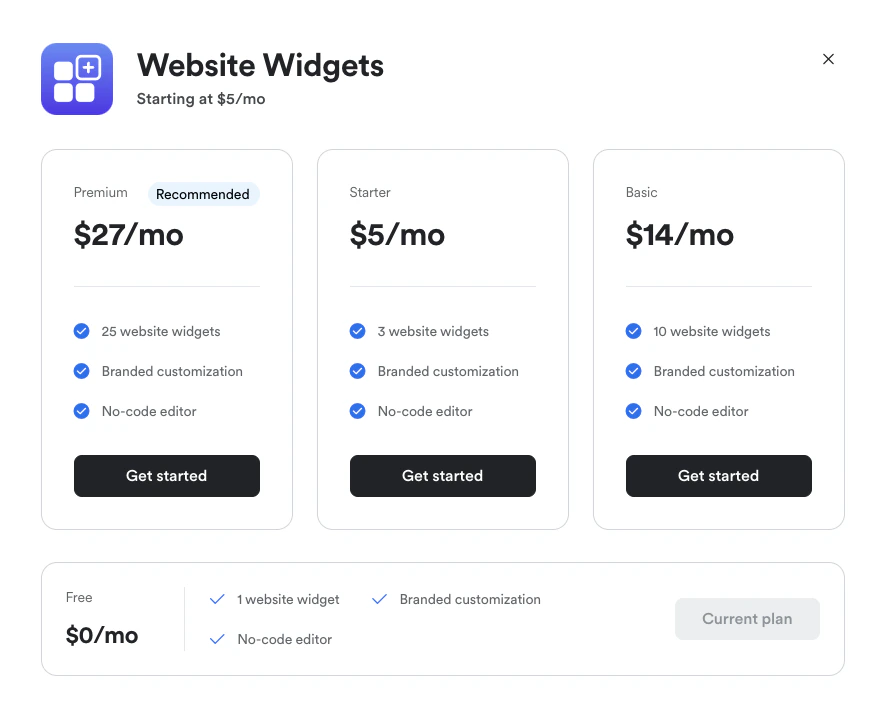
Add a website widget to a page
Note:If you’re adding a widget to a pre-existing page, you may need to update your page template in order to add your widget. Click the “Update” button to the right of your website template name or landing page name to update your template. If you create a new page, your page will automatically have the latest template version.
- Open your page in the Page Builder for editing.
- Click + Add Section in the left sidebar editor to add your widget in a new page section. Or, click to open any existing page section in the editor and click + Add Content.
- Click the Custom widgets tile at the top of the options menu. Or, scroll down and select the “Custom Widget” regular menu tile.
- A modal popup containing a widget library will appear.
- Hover over each widget name in the menu to see a preview and description of the widget. You can also search for a specific type of widget using the search bar.
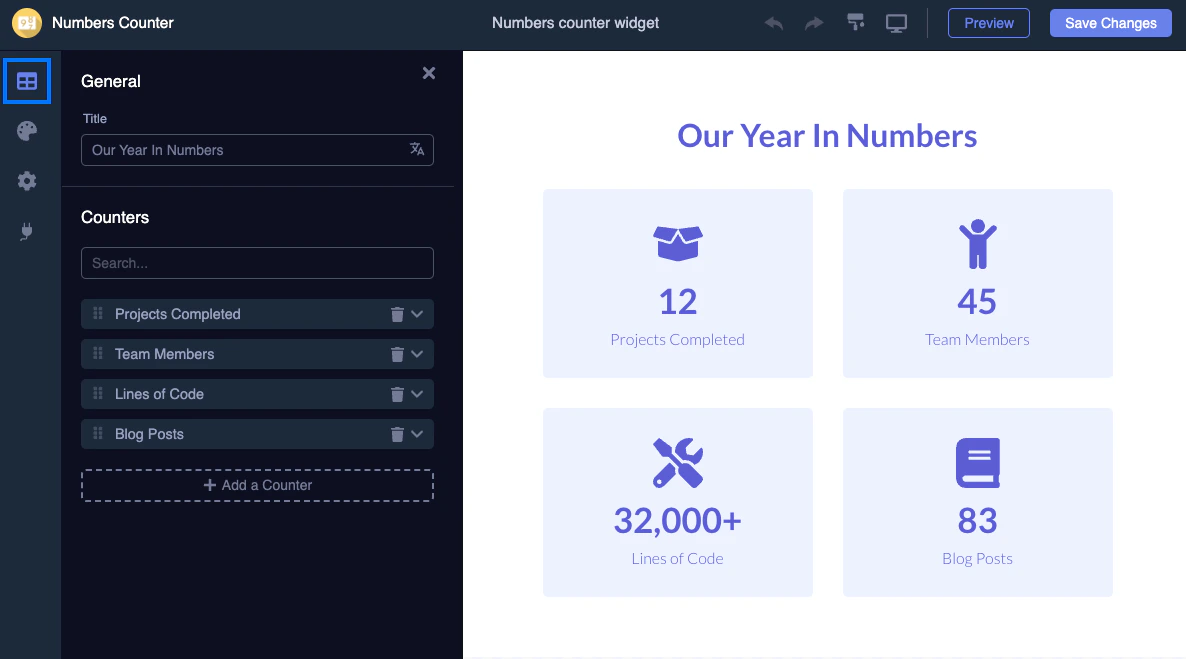
- Click on the name of the widget you want to add to your page. The widget will open in a popup widget editor for customization:
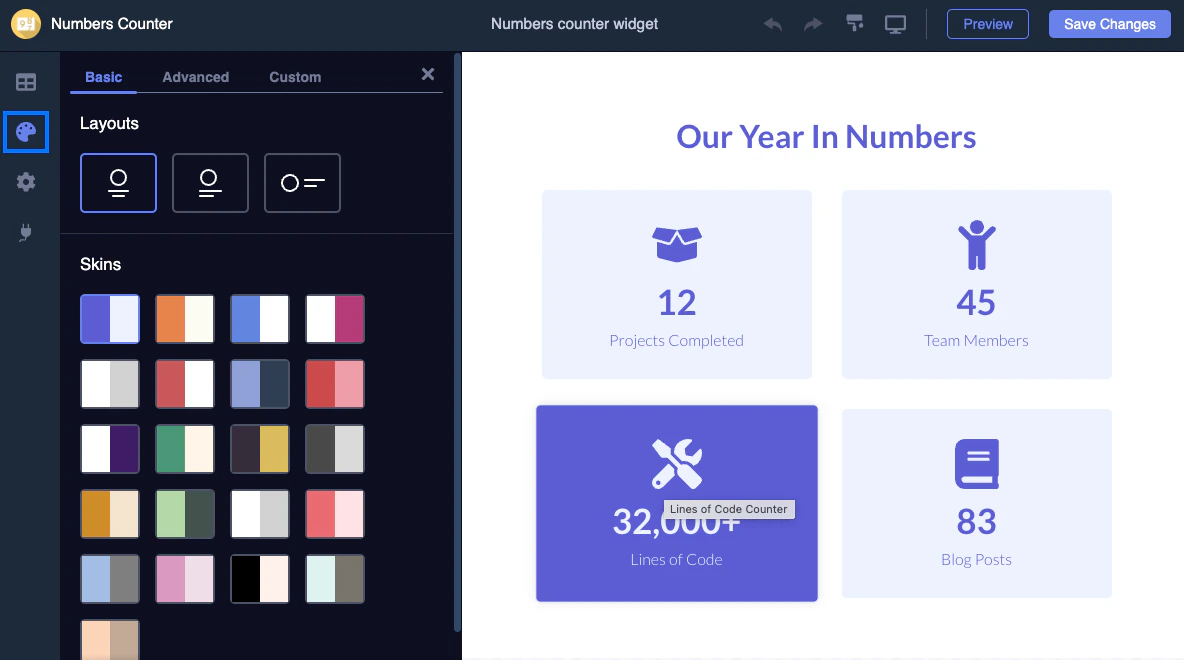
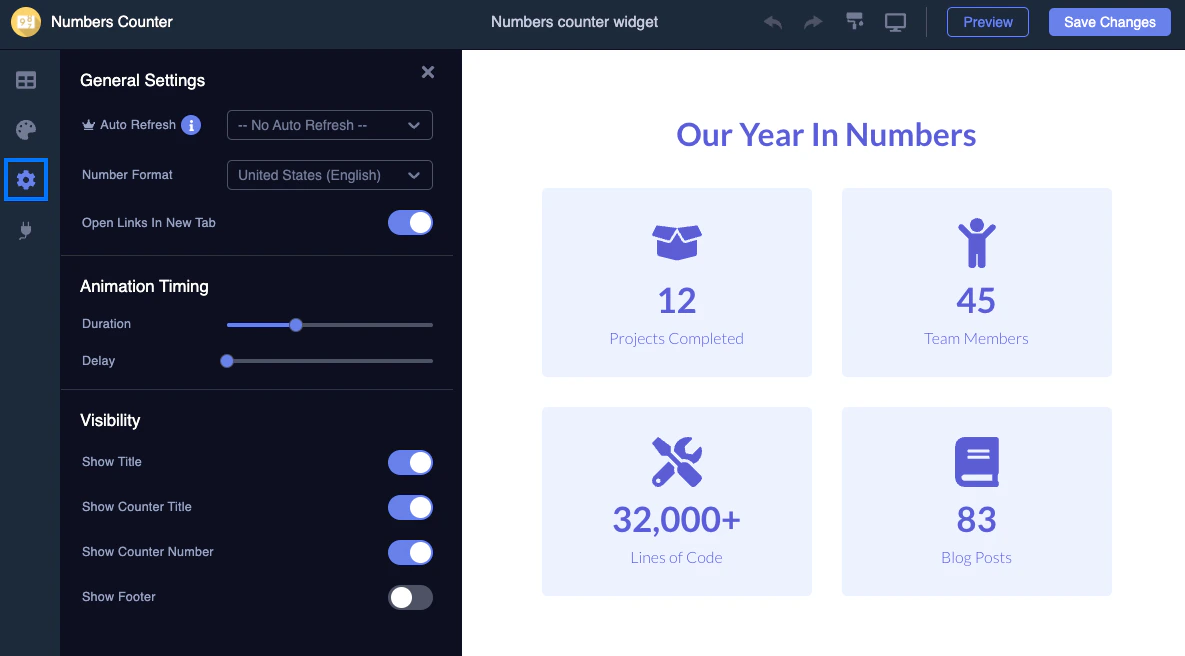
Customizing your widget
Next, customize your widget as desired in the widget editor. Click the tabs on the left sidebar of the editor to view all of the customization options available for your widget.Note:Customization options will vary for each type of widget. The options you see in the widget editor may look different than the options for the Animated Number Counter widget displayed in the screenshot examples below.
- When you’re done customizing, click Preview at the top right of the widget editor to view a preview of your widget.
- Click X at the top right corner of the preview window to return to the widget editor.
- If everything looks good, click Save Changes at the top right of the widget editor. A preview of the widget will be added to your page section in the Page Builder (if you added your widget in a new section, it will appear at the bottom of your page.)
- Important: You must next click Save at the top right of the Page Builder to save and apply your changes to the page.
Upgrade your widget tier
Ready to add more widgets? You can conveniently upgrade your widget tier from inside the widget library. To upgrade to a paid tier:- Open any website or landing page in the Page Builder. (Note: If you’re using a pre-existing page, make sure your page is updated to the latest template version or you might not see the widget feature).
- Click + Add Section in the left sidebar editor.
- Click the Custom widgets tile at the top of the options menu.
- A modal popup containing a widget library will appear.
- Click View plans at the top right of the widget library.
- Select the tier level you want to upgrade to and click Get started:
- Make sure to click Confirm to complete the upgrade:
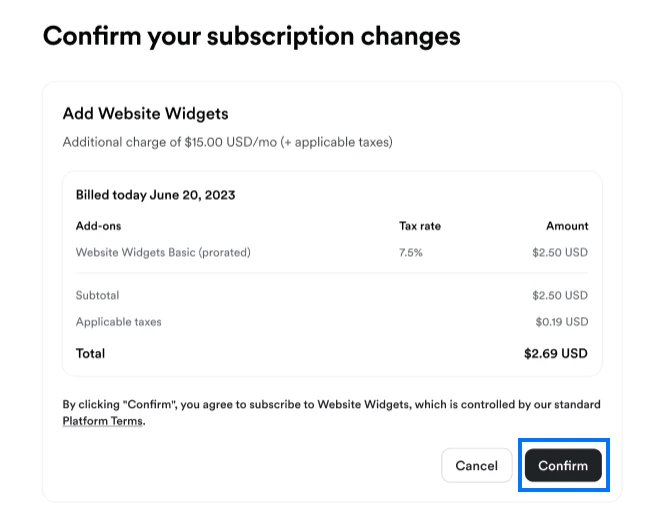
Note:When you sign up for a website widget paid tier add-on, the add-on fee will be prorated to match your current Kajabi plan billing cycle. If you’re on a monthly Kajabi subscription plan you’ll only have the option to select a monthly website widget add-on fee, and if you’re on an annual subscription plan you’ll only have the option to select an annual widget add-on fee.
Edit a widget
To edit a widget you’ve added to a page:- Open your page in the Page Builder for editing.
- Click to open the widget in the sidebar editor.
- Then, click Edit widget. The widget will open in a popup widget editor for customization.
- Edit your widget as desired in the widget editor.
- When you’re done editing, click Preview at the top right of the widget editor to view a preview of your widget.
- Click X at the top right corner of the preview window to return to the widget editor.
- If everything looks good, click Save Changes at the top right of the widget editor. Your changes will automatically appear in both the Page Builder and on your live page. You don’t need to click “Save” again in the Page Builder when editing an existing widget:
Note:Widget blocks cannot be duplicated in the Page Builder. If you duplicate a page section containing a widget block, the widget block will not be duplicated. If you duplicate an entire page with a widget block, only an empty placeholder widget block will be added to the copied page. However, you can manually recreate your widget on the new page if desired.
Delete a widget
To remove a widget you’ve added to a page:- Open your page in the Page Builder for editing.
- Click to open the widget in the sidebar editor.
- Scroll to the bottom of the sidebar editor and click Delete This Block. (Note: If you added your widget inside a Custom Widget page section and you also wish to delete that section from your page, click Delete This Section.)
- Important: You must next click Save at the top right of the Page Builder to save and apply your changes to the page: