

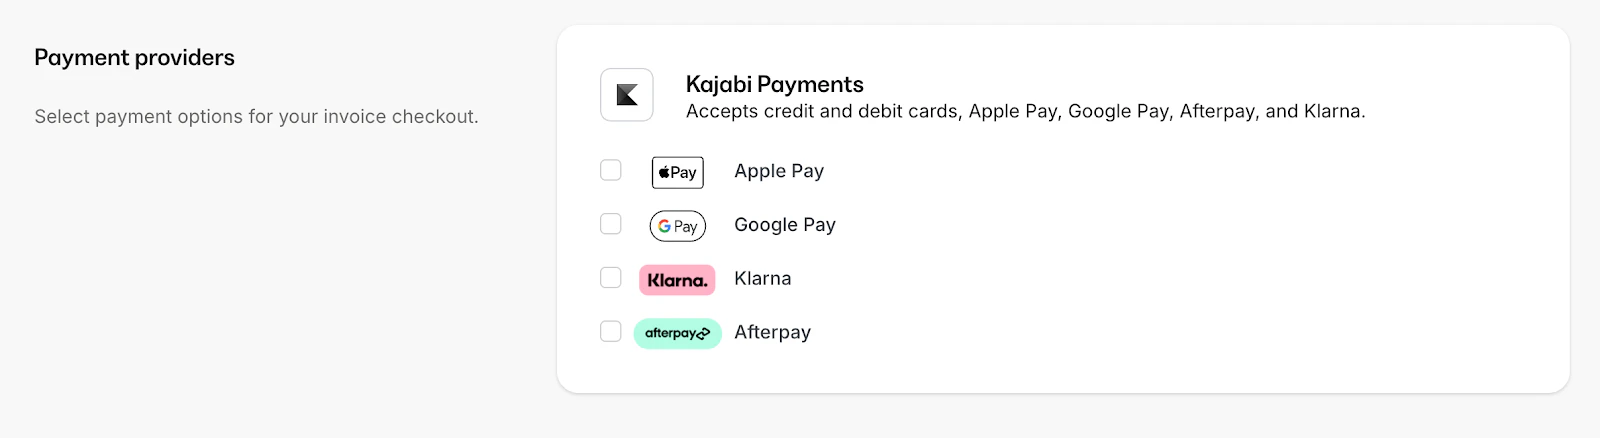
Overview
Kajabi Cart allows your customers to add multiple offers to a shopping cart and complete a single checkout. With Cart enabled, customers can browse your offers, add items they want, and purchase everything together. This creates a shopping experience similar to traditional e-commerce stores and can increase average order value by making it easy to buy multiple products at once.Enable Cart for your site
Before customers can use Cart, you need to enable it in your site settings:- Open Settings from your Dashboard
- Click Checkout
- Toggle on Enable Cart
- Click Save
Configure Cart settings
Customize how Cart behaves across your site:Cart icon placement
Choose where the Cart icon appears:- Header — Displays in your site navigation
- Floating — Shows as a fixed icon on the page
- Both — Appears in header and as a floating icon

Cart behavior settings
- Show cart preview — Displays a dropdown preview when customers hover over the Cart icon
- Auto-open on add — Automatically opens the cart panel when an item is added
- Show item count — Displays the number of items in the cart on the icon
Add Cart buttons to your pages
Once Cart is enabled, add “Add to Cart” buttons to your pages:- Open the Page Builder for your page
- Add or select a button element
- Click Action in the button settings
- Select Add to Cart
- Choose the offer to add
- Click Save
Note: Only offers with one-time payments are compatible with Cart. Subscriptions and payment plans require direct checkout.
Create a cart page
Give customers a dedicated page to review their cart before checkout:- Create a page in the Page Builder
- Add the Cart section from the section library
- Customize the layout and styling
- Publish the page
- Link to this page from your Cart icon in settings

Add products to pages for Cart
Display products that customers can add to their cart:- Open your page in the Page Builder
- Add a Product Grid or Product Card section
- Select the offers to display
- Enable Add to Cart buttons on each product
- Customize the display settings
- Publish your changes
Set up coupons for Cart
Enable customers to apply coupons during cart checkout:- Open Sales > Coupons
- Create or edit a coupon
- Enable Allow in Cart checkout
- Configure the coupon rules
- Save the coupon
Best practices for Cart
- Group related products — Display complementary offers together to encourage multiple purchases
- Use clear product images — Help customers quickly identify items in their cart
- Show pricing prominently — Display individual and total prices clearly
- Test the full flow — Complete a test purchase to ensure the experience works smoothly
- Keep product pages simple — Focus on key information that helps customers decide
Important: Cart is designed for one-time payment offers only. If you sell primarily subscriptions or payment plans, the standard checkout flow may be more appropriate for your business.
Troubleshooting
Cart icon not appearing
- Verify Cart is enabled in Settings > Checkout
- Check the icon placement settings
- Clear your browser cache and refresh the page
Add to Cart button not working
- Confirm the button action is set to Add to Cart
- Verify the linked offer is published and available
- Check that the offer uses one-time payment pricing
Coupons not applying in Cart
- Ensure Allow in Cart checkout is enabled on the coupon
- Verify the coupon is active and within its valid date range
- Check that the cart items meet the coupon requirements